11 Awesome Twitter Wallpapers [Download]

Twitter is a free social networking and micro-blogging service that enables its users to send and read other users’ updates known as tweets. Some Days Back We Mention About some Twitter Best 8 Photo and Video Sharing Tools for Tweeples. Now am here positng some of the Cool Twitter wallpapers. Hope you like them
twitter wallpapers
twitter wallpapers
twitter wallpapers
twitter wallpapers
twitter wallpapers

twitter wallpapers

twitter wallpapers

twitter wallpapers


twitter wallpapers

Are there any others that I may have missed? Have you tried any of the above? Leave your thoughts in the comments! follow me on twitter also!

Change the order of posts in Blogger + Sticky post

blogger logo

CHANGING ORDER OF YOUR POSTS (BACK DATING)

In New Blogger, we can easily (but not so practically), change the order of our posts. The only way to do it is by changing dates of our posts. At least for now.

That means, if I don't want my NEW post to appear as a FIRST one on the page, when composing it, I'll change it's date to the past (back date it). Now, even if it's just published, it will go "down" as far as I've set the date...This is practical when:

  • you're designing your blog, and want to make, for example, categories, or lists, menus....and you don't want those to appear as a regular post
  • you just want to change the order of your posts
  • and you'll think of more.....
To do it, go to:
DASHBOARD --> POSTING --> EDIT POSTS, click on "Edit" of the post you want to play with, and on the bottom of the box, click on the "Post Options".
Change the date. Publish the Post.


STICKY POST

"Sticky" post is a post that will appear on your main page as a FIRST post. On the top of your Blog. Always (or as long as you want). This is convenient when:
  • you want a certain post to be the first thing your reader will see
  • you want to make some announcements, or navigation, categories, or anything else (giving your blog a website look)
  • it's practical, easy editable, and you can always remove it, of course...
I'll show you 2 methods of doing this:

1. Sticky Post by changing the date of a post
If you would like a certain post to appear (and stay) on the top, go to:

DASHBOARD --> POSTING --> EDIT POSTS, click on "Edit" of the post, and on the bottom of the box, click on the "Post Options". (look at the picture above).
  • change the date. Set it as far as you can in the future. Remember, when that date comes, your post will go down, so it's better to send it as far as you can.
  • publish the post
  • there's no limit on changing dates for posts. You can do it as many times as you want

IMPORTANT!
This will not work if the post wasn't previously published. That means: you can't create a NEW POST, and set it's date in the future. If you publish it like this, it will be SCHEDULED.

2.Sticky post in a Gadget
You can use "Text", "HTML/Java Script" or "Picture" Gadgets to make your "Sticky". Go to:

DASHBOARD --> LAYOUT --> PAGE ELEMENTS, "Add a Gadget", and choose one from the list ("Text", for example).
Edit it, and place some text in it, or pictures, or whatever...."drag" the box in PAGE ELEMENTS above you post section, to make it appear Above posts.


  • advantage of this method: no changing dates, it appears on the top until you remove it, it's easy to edit
  • disadvantage: it's not same as composing posts. There's no "link" buttons for uploading pictures automatically, and you'll have to use HTML code a bit (maybe not, depends what kind of content you'll have)
  • in overall, it's a good method

Back up your Blog Posts + Comments completely

blogger logo
NOTE: These are instructions for Beta (XML) Blogger Blogs

We are going to explain how to Back up your entire Blog Content, including Posts, Comments and Widgets.

Ok, there are a few methods to do this. There are more that few, but they are kind of different. Let's see the most practical ones first.

1. BACK UP WITH BLOGGER

The easiest possible way.... Go to:
SETTINGS ► BASIC ► beside BLOG TOOLS, click on the Export Blog, and once more on EXPORT BLOG button.
Choose the location where you want to save the file, and click Save. And that's it!

Your Blog (content + posts) is save as .xml document. Quite small, too. You will not be able to see it, or read it on externally, but you can always upload it through Blogger.
This is also suitable for exporting certain posts to another Blog, but we'll cover that in some other tut...
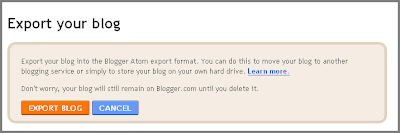
You Blog is saved to a hard drive (your computer), and if anything happens, you can always bring it back.

2. BACK UP ONLINE USING "BLOGBACKUPONLINE"

Yet another easy method. You just have to visit BlogBackUpOnline, open an account, register your blog, and it will be backed up daily. They offer enough memory (space) to store your Blog. Even for a Full time blogger :)



3. BACK UP YOUR BLOG USING SCRAPBOOK FIREFOX EXTENSION

For the users of Firefox Browser (if you're not, just download it here) there's a way to Back up your Blog using Scrapbook extension. You can download Scrapbook here. Install it, restart Firefox browser.
For the detailed instructions download this Pdf Document.
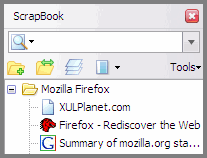

There are some other alternatives, (like downloading Complete Web Pages manually), but I found these the most appropriate and practical...Good luck with everything.

Create a 3-D Globe Planet Earth in Photoshop [How to]

Here its tutorial of Photoshop about How to Create a 3-D Globe Earth in Photoshop? if you likethis post then dont forget to share this post and Subscribe our FEED or follow on Twitter also!

Result:
photosop tutorial

Step 1:
This is picture of earth made in vectors. You can find allready draw in vectors on internet, or you can draw by yourself in corel or illustrator and then export to photoshop. It's your choise. When you decide how you gona get this picture, make sure that picture is draw in two layers.

photosop tutorial

Step 2:
We now start with first (yellow) layer.

photosop tutorial


Step 3:

Go to Layers style and give Gradient. Chose some gray-light blue color and from the same palete for second color chose more lighter almost white.

photosop tutorial

Step 4:

Then open new layer and draw shape like this. Color him in black.
photosop tutorial
Step 5:

To cut unneceassary parts, give selection to first layer (previos yellow).
To do that, hold ctrl and click on first layer in layer window.
Then use Inverse selection. Shift+Ctrl+I Now go back to second layer and press delete.
photosop tutorial


Step 6:

Go to Filter>Blur and give Gaussian blur effect. Then in Layers window put opacity to 40%.

photosop tutorial

Step 7

Now open new layer. Draw rounded shape and color in white.

photosop tutorial

Step 8:

Use again Gaussian blur effect.

photosop tutorial

Step 9:

OK. This is how it look's.

photosop tutorial

Step 10:

Now select second layer from start (red) and in layer style give Gradient with some dark blue color.

photosop tutorial
Step 11:
Then open new layer and draw shape like in picture. use Transformation tool to give this position.

photosop tutorial
Step: 12
Use Gradient tool like in picture.

photosop tutorial

Step 13:

Repeat Gaussian blur effect.
photosop tutorial


Step 14:
Put smaller opacity. About 30-40%
Ok. now we gona make some shadows.
Put all layer together in one Set.
Duplicate that set and merge him.
Go to Layer>Merge layer set. color him in layer option in black and use gaussian blur effect.
photosop tutorial
Step 15:
Repeat same step with dow shadow. Use distort transformation and make position like in picute.
photosop tutorial

Step 16: (RESULT)

In the end give some gradient fill to background.Finish


photosop tutorial

Paperview - Free Wordpress Theme


Motivated from the succes made by the Paperview Template for Blogger, and all the feedback that you guys gave me. I have decided to convert it to worpress. So here it is! I hope you enjoy it!

It features a newspaper style, with a very cool contrast and stylish titles. You'll get a custom dinamic navigation at the top which automatically adds new buttons as you create new pages. A widget ready sidebar to make your life much easier. And much more!

If you have any questions or problems with that theme, please drop me a comment, or use the contact section.

Live Demo | Download
blog comments powered by Disqus